Probes
This is Chapter 12.
Readiness probe
spec:             # This is the Pod spec in the Deployment.
 containers:
   - image: kiamol/ch03-numbers-api
     readinessProbe:        # Probes are set at the container level.
       httpGet:
         path: /healthz     # This is an HTTP GET, using the health URL.
         port: 80
       periodSeconds: 5     # The probe fires every five seconds.
This is using a httpGet action, which is suited more for web apps. Will be marked as ready if code returned is b/w 200 and 399. When a Pod is detected as not ready, the Pod’s IP address is removed from the Service endpoint list, so it won’t receive any more traffic.
Deployments do not replace Pods that leave the ready state when a probe fails, so we’re left with two Pods running but only one receiving traffic.
You can get into a situation where no pods are receiving traffic at all
This is why you absolutely have to have a liveness probe, a readiness probe on its own is dangerous!
Liveness Probe
Uses the same mechanism as readiness probes, it even looks the same, but it wil restart the Pods if they become unhealthy, unlike readiness probes.
The Pod is not replaced, they are restarted (so run on the same node but new container).
livenessProbe:
 httpGet:                 # HTTP GET actions can be used in liveness and
   path: /healthz         # readiness probes--they use the same spec.
   port: 80
 periodSeconds: 10
 initialDelaySeconds: 10  # Wait 10 seconds before running the first probe.
 failureThreshold: 2      # Allow two probes to fail before taking action.
Testing Liveness Probe
This is a clever way of testing the livenessProbe:
spec:
  containers:
  - name: liveness
    image: repo/name
    args:
    - /bin/sh
    - -c
    - touch /tmp/healthy; sleep 30; rm -f /tmp/healthy; sleep 600
    livenessProbe:
      exec:
        command:
        - cat
        - /tmp/healthy
      initialDelaySeconds: 5
periodSeconds: 5Failed liveness checks will cause a pod to restart, not to be replaced.
For transient issues, it works well, provided the application can restart successfully in a replacement container. Probes are also useful to keep applications healthy during upgrades, because rollouts proceed only as new Pods enter the ready state, so if a readiness probe fails, that will pause the rollout.
Production
Using both probes together
Also see the exec.command functionality which is very useful.
todo-list/db/todo-db.yaml
spec:
 containers:
   - image: postgres:11.6-alpine
     # full spec includes environment config
     readinessProbe:
       tcpSocket:           # The readiness probe tests the
         port: 5432         # database is listening on the port.
       periodSeconds: 5
     livenessProbe:         # The liveness probe runs a Postgres tool,
       exec:                # which confirms the database is running.
         command: ["pg_isready", "-h", "localhost"]
       periodSeconds: 10
       initialDelaySeconds: 10
Database probes mean Postgres won’t get any traffic until the database is ready, and if the Postgres server fails, then the database Pod will be restarted, with the replacement using the same data files in the EmptyDir volume in the Pod.
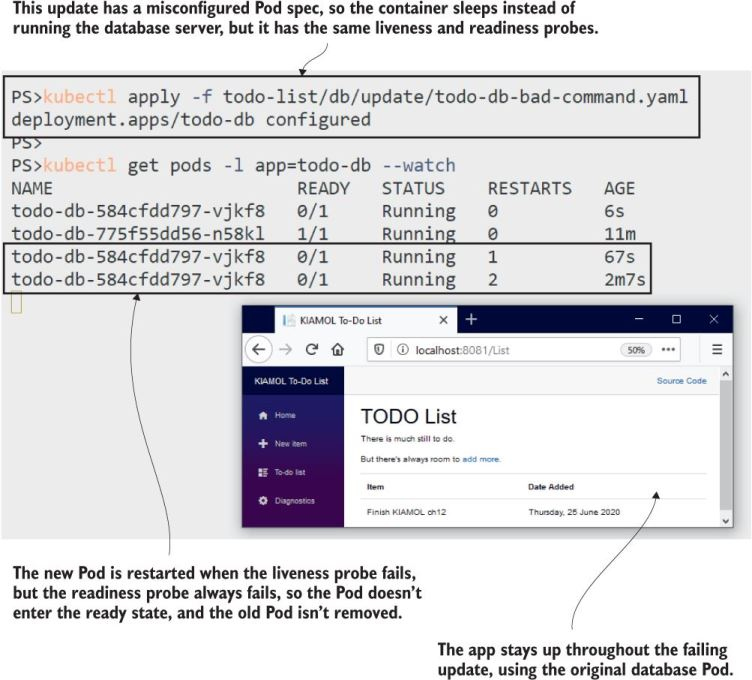
Prevents Bad Rollouts
What commonly happens is someone repalces the startup command with sleep or something similar for debugging and forgets to revert it back. The probes would catch that and keep the app available (because it would prevent a rollout).
While the new Pod keeps failing, the old one is left running, and the app keeps working.
Helm
Because Helm supports atomic installs & upgrades (--atomic) that rollback automatically if they fail, probes + Helm is a great combo.
If the Pod isn’t ready within the Helm timeout period, so the upgrade is rolled back, and the new Pod is removed; it doesn’t keep restarting and hit CrashLoopBackOff as it did with the kubectl update.
Just a reminder: this is how to do a helm install and an upgrade
# install
helm install --atomic todo-list todo-list/helm/v1/todo-list/
# upgrade
helm upgrade --atomic --timeout 30s todo-list todo-list/helm/v2/todo-list/
This is what an atomic rollback looks like:
Error: UPGRADE FAILED: release todo-list failed, and has been rolled back due to atomic being set: timed out waiting for the conditionForcing a container to exit
You can force a container to exit with the following command. This might be useful for testing:
kl exec -it {pod name} -- killall5This will cause the pod to restart the container, not replace it.